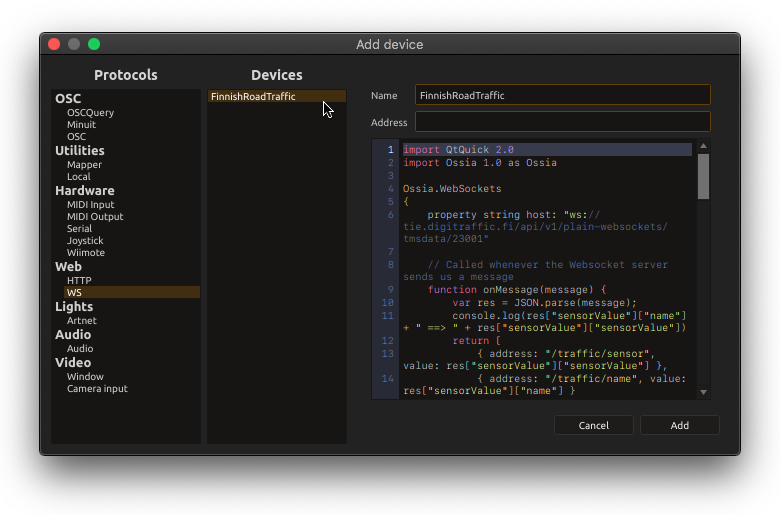
WebSocket device

This device allows to connect to an existing WebSocket server, and exchange messages bidirectionally.
Since such servers can have arbitrarily complex APIs, we have to map these APIs to score’s tree-based parameter model. This is done with a QML script, just like for the Serial and HTTP devices.
Sample code
Consider a WebSockets server which notifies about road traffic (available in the user library):
/**
 * To try:
 * - Install node.js
 * - npm install ws
 * - node RoadTrafficServer.js
 *
 * This server has the following API:
 * - It will regularly send the message to its clients:
 * {
 *   sensorValue: {
 *     name: "Some place",
 *     value: 123 // the sensor reading, some dummy number which increments
 *   }
 * }
 *
 * - It reacts to the following message:
 * { sensor: X } // X can be between 0 and 3
 *
 * and will change the sensor being updated appropriately.
 *
 */
const ws = require("ws");

const wss = new ws.WebSocketServer({ port: 8080 });
const clamp = (num, min, max) => Math.min(Math.max(num, min), max);

let sensors = [
    { name: "Hôtel de ville", value: 0 },
    { name: "St. Catherine", value: 140 },
    { name: "Place de la Bourse", value: 7 },
    { name: "Cours de la Libération", value: 15 },
];

let currentSensor = {
    sensorValue: sensors[0]
};

let index = 0;

wss.on('connection', function connection(ws) {
  ws.on('message', function message(data) {
    console.log('received: %s', data);

    const rq = JSON.parse(data);
    const idx = parseInt(rq.sensor);

    console.log(rq, clamp(idx, 0, 3));
    currentSensor = {
        sensorValue: sensors[clamp(idx, 0, 3)]
    };

    ws.send(JSON.stringify(currentSensor));
  });

  setInterval(() => {
    currentSensor.sensorValue.value ++;
    ws.send(JSON.stringify(currentSensor));
  }, 100);
});
The following QML code is able to interact with it:
import Ossia 1.0 as Ossia

// Note: to run this example you need to run the RoadTrafficServer.js
// available in the library
Ossia.WebSockets
{
    property string host: "ws://127.0.0.1:8080"
    // Called whenever the Websocket gets connected
    function onConnected() {
        console.log("Connected !")
        return [ ]; // Return type: see onMessage
    }

    // Called whenever the Websocket gets disconnected
    function onDisonnected() {
        console.log("Connected !")
        return [ ];  // Return type: see onMessage
    }

    // Called whenever the Websocket server sends us a message
    function onMessage(message) {
        // The message has the format:
        // {
        //   sensorValue: {
        //     name: "Some place",
        //     value: 123 // the sensor reading, some dummy number which increments
        //   }
        // }
        //
        // We want to convert it into the following ossia address space
        // and apply a simple mapping:
        //
        // /traffic/name: "Some place"
        // /traffic/value: 1.23

        // 1. Parse the json
        var res = JSON.parse(message);

        // 2. For each address to update in the tree, return a message:
        // { address: "/foo/bar", value: ... }
        return [
            { address: "/traffic/sensor", value: res["sensorValue"]["value"] / 100. },
            { address: "/traffic/name", value: res["sensorValue"]["name"] }
        ];
    }

    // This is used to set-up the device tree with the relevant functions
    function createTree() {
        return [
        {
            name: "traffic",
            children: [
                // These two will just display the value from onMessage
                {
                    name: "sensor",
                    type: Ossia.Type.Float
                },
                {
                    name: "name",
                    type: Ossia.Type.String
                },

                // This one is a request to be made to the server
                {
                    name: "change_sensor",
                    type: Ossia.Type.Int,

                    // For the three following functions,
                    // the return value is sent to the WS server if not undefined:

                    // 1. When a message is sent from score
                    request: function (value) {
                        // value is:
                        // {
                        //   type: "some_type"
                        //   value: ... the actual value ...
                        // }
                        // e.g. { type: Ossia.Type.Int, value: 123 }
                        // in order to differentiate between ints, floats, etc
                        return JSON.stringify({ sensor: value.value });
                    },

                    // 2. When score listens on a node
                    openListening: function () {
                        console.log("open listening");
                    },

                    // 3. When score stops listening on a node
                    closeListening: function () {
                        console.log("open listening");
                    }
                }
            ]
        }
        ];
    }
}
Creating a device from existing JSON
Consider an API which regularly updates its clients with the following JSON:
{
"widget": {
    "debug": "on",
    "window": {
        "title": "Sample Konfabulator Widget",
        "name": "main_window",
        "width": 500,
        "height": 500
    },
    "image": {
        "src": "Images/Sun.png",
        "name": "sun1",
        "hOffset": 250,
        "vOffset": 250,
        "alignment": "center"
    },
    "text": {
        "data": "Click Here",
        "size": 36,
        "style": "bold",
        "name": "text1",
        "hOffset": 250,
        "vOffset": 100,
        "alignment": "center",
        "onMouseUp": "sun1.opacity = (sun1.opacity / 100) * 90;"
    }
}
}
This is a tree structure that maps very cleanly to score’s model.
To facilitate this simple case, an user script is provided as part of the user library: it will take a sample JSON and create the relevant QML code.
It is accessible in the Scripts/Protocols/Websockets/Device from JSON menu option.
The processFromJson property on the root Ossia.WebSocket will enable automatic processing of incoming JSON: it will as far as possible be matched
to the structure of the tree in order to update the parameters. Note that this is much more efficient than doing it manually through onMessage as this is implemented directly in C++.